Map creator
This map creator tool will allow you to the create a whole world of your own design using 1180 different images. I included natural parts for the inner landscape, like forests, mountains and hills. All of these elements can be dragged around if you enable this feature.
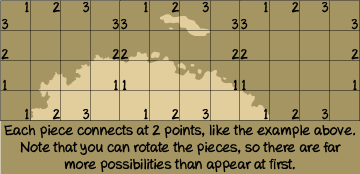
To create the maps I used a grid system, I further divided the maps into sections with 3 connection points. For the top and bottom it will be left, right and the middle, for the sides it will be top, bottom and the middle. It might sound a little confusing, but the following images should help explain it.
Instructions
If you thought 1180 different images was all you were getting you thought wrong. I added the ability to rotate all* pieces, you can change the map size and you can drag around the natural pieces.
*Draggable pieces cannot be rotated and it's a little pointless to rotate natural elements like forests and mountains, unless you want an upside down mountain I guess.
To do all this the instructions are as follows:
- Adding a piece to the map: Click on whichever map piece you wish to change, it will have a blue highlight if it's selected. Now click on any of the pieces from the selection menu (outward corners, inward corners, etc.), the highlighted square is now has turned into whichever piece you selected.
- Rotating a piece: Click on whichever piece on the map you wish to rotate (including draggable pieces) so it has the blue highlight again. Now click on one of the rotate buttons ("rotate 90", "rotate 180", "rotate 270", "reset") to rotate it.
- Mirror: You can mirror an image by selecting it and clicking the mirror button.
- Change map size: Scroll down to below the map, simply insert the values you wish to change the map size and hit apply.
- Dragging pieces: Tick the "Enable draggable pieces" checkbox. Now click on one of the "Land and Sea" pieces in the selection menu to add a piece to the map. This piece can be dragged around with your mouse.
- Toggle grid: You can enable and disable the grid to get a better view of the map by hitting the "toggle grid" button.
- Toggle drags: Toggle the visibility of the draggable pieces on and off using the "toggle drags" button.
- Toggle resize: Toggles the ability to resize draggable pieces, this allows for further customization and for customization with more precision.
- Resetting: To reset the whole map, simply click on the "reset map" button. This doesn't reset the draggable piece, click "reset drags" for that. To reset an individual square back to a sea piece, click on it so it has the blue highlight and click the "reset piece" button.
- Delete draggable: To delete a draggable piece, click it to select it, its border will turn blue. Then click the 'delete draggable' button to remove it.
Saving and loading your map
It's possible to save your map and get back to it later, you can do so by simply clicking the 'save map' button. This will save the map with all the pieces, including draggable pieces, locally in your browser. This only works if you don't use incognito mode and only if you use a modern browser (so no IE7 for example). You can close your browser after you've clicked save, it'll still be there when you open it again.
toggle
When you want to load your map you simply click 'load map' and it'll input all the map pieces back into their original positions. Do note that if you changed the map size you will have to change it again before loading the map.
You can save 3 separate maps right now, I may add more buttons for more maps if there's a need for it, but 3 should be plenty for now.
Important: Draggable pieces
Note that when the draggable pieces are toggled on (and thus visible on the map) you won't be able to select the squared pieces below, the draggable pieces are placed using an overlay which blocks you from accessing what's below.
If you wish to change something on the map, simply click the "toggle drags" button to temporarily hide the draggable pieces. You can now change the map again. Hit "toggle drags" again to show the draggable pieces again, in the position you left them in.
Planning tool
This tool is mostly meant for planning purposes, at least if you want a detailed map. Natural elements are extremely varied, not just in size and shape, but also in positioning, their effect on other natural elements and much more.
A tool like this won't be able to replicate nature well, a square grid system with predefined images would require far more images to do so. But it still works great as a tool to help you plan the ideal version of your map. You can still place elements where you roughly want them to be.
To illustrate this, I made a map using this generator as a planning ground and I then fine tuned that map in an editing program to get a natural looking map.

Saving the image
If you wish to save the map you created you'll have to take a screenshot. On both windows and mac you can take a screenshot of just part of the screen as follows:
- Windows: Open the snipping tool (comes with windows vista, 7 and 8) and drag the crosshair across your created map, you can now save the image with the same tool. If you have an older version you'll have to press 'alt'+ 'prt src' and then paste the image in paint or another program to edit out the rest of the screen.
- Mac: Press 'command' + 'shift' + '4' and then drag the crosshair across your created map. Once you release the mouse button the image will automatically be saved to a folder (I assume the default pictures folder).
- Mobile devices: It really depends on the brand and type of device, so you'll probably have to Google it for your specific device.
Read the instructions above for more info on the controls.
Enable draggable pieces
If you need a bigger map you can change the size by entering the width and height you wish below, the values are in units of squares, like the ones you see when the grid is enabled.
I've capped the maximum size at 25 x 25, which is too big for many screens anyway. The minimum width is 6, the minimum height is 2.
Note: Using a large value for width on a small screen will likely make the page mess up a little. Zooming out will fix that, but it'll make creating a map more difficult, so try to stick to what fits on your screen.
Changing the map size will reset everything.
Share this generator


